Choosing the Right Foundation
Finding the perfect foundation shade and type for your skin can be a daunting task, but with the right guidance, you can master this essential makeup skill. To begin, determine your skin tone and undertone by examining the color of your veins. If they appear green or greenish-blue, you have a warm skin tone, while bluish or purple veins indicate a cool skin tone. If you can’t tell, you likely have a neutral skin tone.
Utilize Technology for Shade Matching
When shopping online, make use of AI foundation shade matchers and virtual try-on services. These tools help you find the best match for your skin tone and undertone. For example, Sephora offers a virtual try-on service that can assist you in finding the right shade.
Consider Your Skin Type and Concerns
Select a foundation based on your skin type and concerns. Opt for liquid foundations for dry skin, mattifying or powder-based foundations for oily skin, and gentle mineral-based formulations for acne-prone skin. Different foundations work better for specific skin types, levels of coverage, and desired finishes.

Ask for Recommendations and Read Reviews
Consult with beauty influencers, read reviews, and ask friends with similar skin tones for recommendations. This will help you narrow down your options and find the perfect foundation shade.
Match the Shade to Your Jawline or Neck
To ensure a seamless blend and natural look, match the foundation shade to your jawline or neck. Ensure it has the correct undertone (cool, warm, or neutral) for the best results.
Choose the Right Foundation Formula
Select a foundation formula (liquid, powder, stick, or cream) that is easy to apply, blend, and suits your skin type. Look for skin-friendly ingredients like hyaluronic acid for hydration or non-comedogenic ingredients to prevent breakouts. Avoid heavily fragranced products if you have sensitive skin.
Use the Appropriate Application Tool
Apply your foundation with the appropriate tool, such as a beauty sponge, foundation brush, or your fingers. Consider selecting a foundation with built-in SPF for sun protection if desired.
Finally, test various foundation products and consider personal preferences like application, feel, coverage, and finish to find the one that suits you best. With these tips, you’ll be well on your way to mastering the art of choosing the right foundation for your skin.
Applying Concealer Correctly
Applying concealer correctly is essential for achieving a flawless makeup look. Concealer helps to hide blemishes, dark circles, and other imperfections, giving your skin a smooth and even appearance. In this section, we’ll discuss some techniques and tips for applying concealer effectively.
Prep Your Skin
Before applying concealer, it’s important to prep your skin with a face primer. This will help your makeup to glide on smoothly and stay in place throughout the day. You can also use a color-correcting concealer palette to address pigmentation issues. Brands like NYX offer affordable options for color correction.
Choose the Right Concealer
Select a concealer that matches your skin tone and blends seamlessly for a natural look. Some popular options include Fenty’s Pro Filt’r Instant Retouch Concealer and Rose Inc Solar Infusion Soft-Focus Cream Bronzer or Saie’s Sun Melt, to counteract the darkness.
Apply Foundation and Concealer
After prepping your skin, apply foundation tailored to your skin type, ensuring even coverage. Next, conceal dark spots or blemishes with your chosen concealer, using an upward motion from the eyes towards the temples. For a brighter look, layer concealer over bronzer, or use bronzer alone for a more natural appearance.
Set Your Makeup
To prevent smudging and creasing, finish your makeup with a powder or setting spray. Urban Decay’s All Nighter Long-Lasting Makeup Setting Spray is a popular choice for maintaining coverage even through sweat and humidity.
Remember, practice makes perfect. Experiment with different techniques and products to create a personalized makeup routine that works for your unique facial features, skin type, and concerns.
Mastering Eyeshadow Blending
Blending eyeshadow is an essential skill for achieving a seamless and professional eye makeup look. With the right tools and techniques, you can master eyeshadow blending and create stunning eye looks that enhance your natural beauty.
First, identify your eye shape. Common shapes include round, almond, hooded, monolid, hazel, gray, and brown eyes. Knowing your eye shape will help you choose suitable eyeshadow shades and application techniques. For example, earthy tones enhance hazel eyes, while cool tones enhance gray eyes.
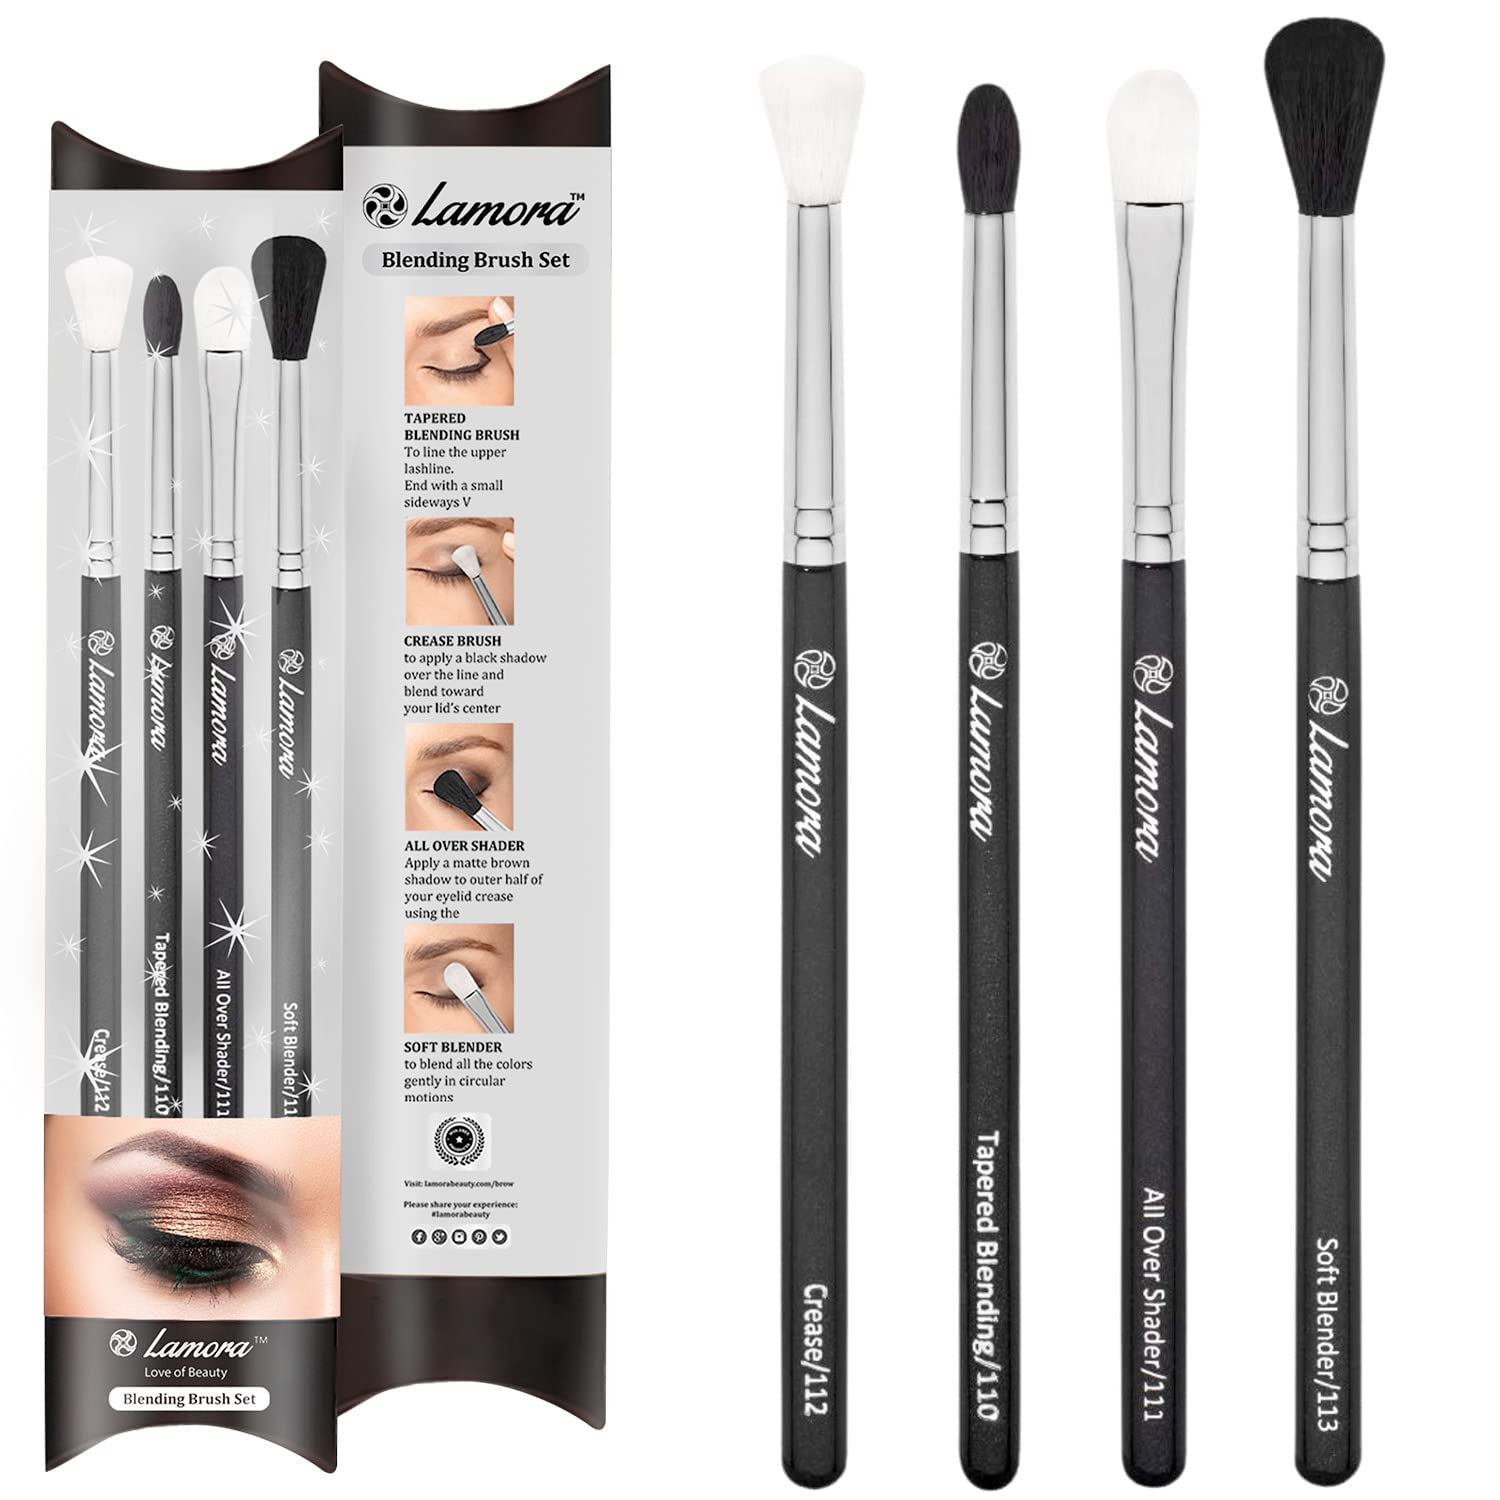
To blend eyeshadow effectively, gather essential tools such as high-quality eyeshadow brushes. These include a blending brush, flat shader brush, small detail brush, eyeliner brush, and thin angled eyeliner brush. Quality makeup brushes not only enhance makeup application but also provide more precision and a more natural, refined look. Consider brush design, fibers, and density when choosing a makeup brush. Opt for synthetic brushes made from materials like nylon or taklon for durability and less shedding.
Application Techniques
Begin by applying a matte black or deep smoky gray eyeshadow to your eyelid using a blending brush. Focus on the outer corner and blend towards the center. Next, contour the crease with a matte eyeshadow shade slightly darker than the one used on your eyelid. Apply the shade to the crease area, starting from the outer corner and blending towards the center.
To add dimension, highlight the brow bone with a shimmery or matte light eyeshadow shade, just beneath your eyebrow arch. For a more intense and smoky look, use a pencil brush to smudge the lower lash line.
Eyeliner can also enhance your eyeshadow blending. Choose a black liquid or gel eyeliner for bold, defined effects and draw a thin line along your upper lash line. Accentuate the look with under-eye liner, applying it to the lower lash line using a kohl pencil or smudging brush, focusing on the outer two-thirds of the eye.
Finish your eye makeup by applying a volumizing and lengthening mascara in black to accentuate your lashes. Optional accents like false lashes, rhinestones, glitter, or metallic eyeshadows can elevate your makeup and add a touch of individuality.
For those seeking simplicity, consider using cream eyeshadow sticks, such as ColourPop Shadow Stix, Milani Gilded Eyeshadow Sticks, and e.l.f. No Budge Shadow Sticks. These easy-to-apply, blendable sticks are available in multiple colors for various eye looks.
With practice and the right tools, you can master eyeshadow blending and create eye-catching makeup looks that showcase your unique style.
Creating the Perfect Eyeliner
Creating the perfect eyeliner look is essential for enhancing your eyes and completing your makeup look. With various eyeliner styles and application techniques, you can find the perfect method for your unique eye shape.
Types of Eyeliners
There are several types of eyeliners to choose from, including pencil, liquid, gel/cream, powder, and kohl liners. Pencil eyeliners are popular for their ease of use and versatility. Liquid eyeliners, on the other hand, create sharp and precise lines for winged or cat-eye looks. Maybelline offers a wide range of eyeliner options to suit your needs.
Eyeliner Techniques for Different Eye Shapes
Eyeliner can alter the perceived shape of your eyes, creating the illusion of larger, more elongated, or more lifted eyes. Here are some techniques for various eye shapes:
1. Almond Eyes: Apply thicker liner from the inner eye corner and taper towards the outer corner. Also, apply to the lower lash line, focusing on the outer two-thirds.
2. Close-Set Eyes: Apply eyeliner from the middle of the upper lash line, gradually thickening towards the outer corner. Add shimmery lighter tones at the inner corners to open up space.
3. Deep-Set Eyes: Apply a medium to thick line along the upper lash line.
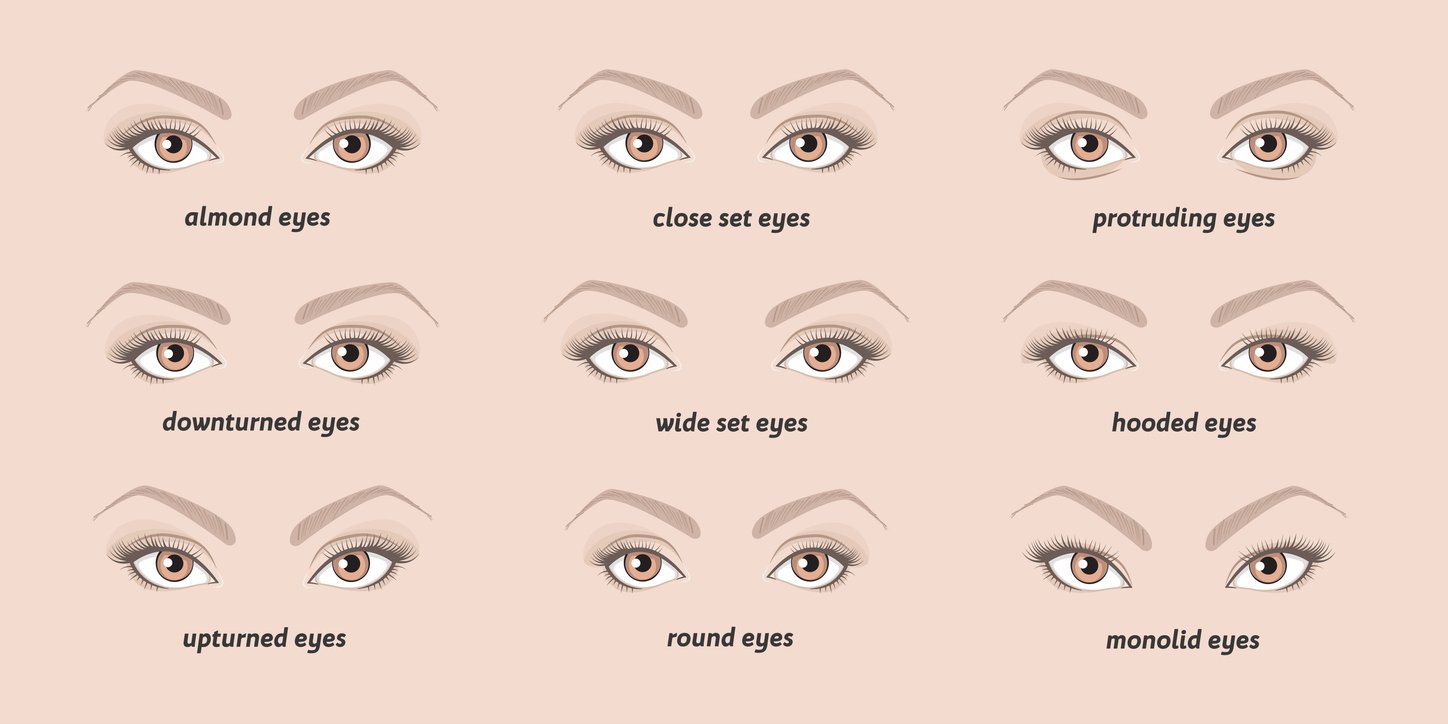
Use winged or cat-eye liner shape to create an illusion of lifted and elongated eyes. Avoid heavy lower lash liners.
4. Downturned Eyes: Apply eyeliner along the upper lash line starting at the inner corner, gradually thickening towards the outer corner. Extend the liner slightly upwards and outwards to create a lifting effect.
5. Hooded Eyes: Apply minimal eyeliner from the inner corner to the outer corner, and create a wing. Avoid applying eyeliner to the lower waterline.
6. Round Eyes: Apply eyeliner along the upper lash line, gradually thickening toward the outer corner. Create a subtle wing or flick to add length. Apply a thin line to the lower lash line from the outer corner tapering towards the center.
Popular Eyeliner Styles
There are numerous eyeliner styles to experiment with, such as the classic cat-eye, which was a go-to style for Marilyn Monroe. Another popular style is the fishtail eyeliner, a double-wing trend seen on the TV show “Euphoria.” For a more dramatic look, try graphic eyeliner or neon eyeliner to add a pop of color to your face.
Remember, practice makes perfect. Keep experimenting with different eyeliner styles and techniques to find the one that best suits your eye shape and personal style.
Sculpting with Contour and Highlight
Contouring and highlighting are essential makeup techniques that can enhance your facial features and create dimension. By using darker shades for contouring and lighter shades for highlighting, you can achieve a striking and sculpted appearance.
Choosing the Right Contour Makeup
Selecting the perfect contour makeup shades and formulas for your skin tone is crucial. Matte bronzers, one or two shades darker than your skin tone, are often recommended. Sephora offers a wide range of contouring products to suit various skin tones and types.
Application Techniques
The “E” or “3” technique is an essential method for contouring. It involves drawing an imaginary “E” or “3” along the side of your face, starting at the temples, dipping down and beneath the cheekbones, and concluding at the jawline and chin. This technique helps slim the face and certain facial features like the nose and jawline.
Contouring techniques may vary depending on your face shape. For instance, a round face requires creating shadows along the sides of the face, temples, and under the cheekbones.
Blending for a Natural Look
Blending is crucial for achieving a natural-looking contour. Use circular motions or gentle tapping to blend the contour lines seamlessly. Mastering the art of contouring takes practice, experimentation, and patience.
Highlighting Techniques
Highlights and shadows are essential for a successful contouring effect. Apply lighter shades to the areas you want to emphasize, such as the tops of your cheekbones, the bridge of your nose, and your cupid’s bow.
Setting Your Contour Makeup
To ensure a long-lasting, flawless finish, set your contour makeup with a translucent powder or setting spray. Ulta Beauty offers a variety of setting products to choose from.
Remember, contouring is not a one-size-fits-all technique. It should be tailored to your individual face shape, skin tone, and desired look. With practice and the right products, you can master the art of sculpting your face with contour and highlight.
Choosing and Applying Lipstick
Choosing the perfect lipstick shade and finish is essential for a harmonious look that complements your skin tone and undertones. Universally flattering shades like deep red wine, such as Clinique’s Black Honey and Pat McGrath’s MatteTrance Lipstick in Full Blooded, are a great starting point. However, it’s crucial to test various shades to find the best match for your unique complexion.
For special events like weddings, consider factors such as your skin tone, undertones, wedding theme, and overall makeup look when selecting a lipstick shade. Opt for long-lasting, transfer-proof, or matte formulas to ensure your lipstick stays put throughout the day. Remember to moisturize your lips well before applying matte lipsticks, as they can be drying.
As our skin and lips age, they become thinner and require additional care and precision in application. Adjust your lipstick colors and formulas accordingly, and don’t hesitate to seek advice from makeup artists or use technology like mobile apps for tips, tutorials, and shade matching tools.
To achieve a flawless lip application, start by exfoliating your lips and applying a primer and/or lip liner.

Choose long-lasting, water-resistant, or liquid products in matte or powder-based formulas for the best results. Stick to shades close to your natural skin color or nude shades for easier touch-ups throughout the day.
For a trendy look, try the Cherry Cola Lips shade by blending a brown lip pencil with a matte red lipstick. Additionally, consider environmentally friendly lipstick options, such as Quadpack’s new Emerald Lipstick, which offers minimalist designs and recyclable materials.
Another option for on-the-go lipstick application is Rouge Louboutin On The Go, a compact addition to the iconic lipstick range. It’s available in 12 shades and three textures, providing long-lasting hydration and various makeup finishes.
Finally, to ensure your lipstick stays put, use a setting spray before and after application or seal in the color with a similar matte shade. With these tips, you’ll master the art of choosing and applying lipstick for a flawless pout every time.
Setting Your Makeup
Setting your makeup is an essential step in achieving a flawless and long-lasting look. It helps to lock in your makeup, ensuring it stays put throughout the day. In this section, we’ll explore various methods and products for setting your makeup, as well as some tips and techniques for a perfect finish.
Choose the Right Setting Products
To set your makeup, you can use a setting spray or powder. Selecting the right product depends on your skin type and desired look. For a natural, dewy finish, opt for a setting spray like Urban Decay’s All Nighter. If you prefer a matte finish, a setting powder such as Laura Mercier’s Translucent Loose Setting Powder might be a better choice. Remember to use a setting product with the same base as your foundation and concealer to prevent makeup separation.

Apply Setting Products Correctly
After completing your makeup, apply your chosen setting product. If using a setting spray, hold the bottle at arm’s length and mist your face evenly. Allow it to dry before applying mascara to avoid smudging. For setting powders, use a fluffy brush to lightly dust the product over your face, focusing on areas prone to shine or creasing.
Combine Products for Extra Longevity
For makeup that lasts even longer, consider combining setting powders and sprays. First, apply a light layer of setting powder, followed by a mist of setting spray. This technique helps to lock in your makeup and provide extra staying power.
Tips and Techniques for a Flawless Finish
To achieve a flawless finish, follow these simple tips:
– Ensure your makeup tools are clean and match your primer to your foundation for a smooth base.
– Apply pink blush under the eyes or where facial hair grows to combat dark areas.
– Choose either bold eyes with a soft lip color or bold lips with more subtle eye makeup for a balanced look.
– Customize strip lashes by stacking, cutting, and trimming individual lashes to suit your eye shape.
– Set contour makeup with a translucent powder or setting spray for a seamless finish.
By incorporating these methods and tips into your makeup routine, you’ll be well on your way to mastering the art of setting your makeup for a flawless, long-lasting look.